Creating a Simple Resume Website Using Lume
Written by Nap Joseph Calub on April 19, 2025
Overview
This article provides a step-by-step guide to creating a simple resume website using Lume, a static site generator. We'll set up the project, create layouts with Vento, style it with Tailwind CSS, manage content using LumeCMS, and deploy it to GitHub Pages. The final result is a clean, professional-looking resume site you can customize and update easily. Low coding knowledge required – just your curiosity and the ability to use ChatGPT.
Why Lume?
Lume is fast, minimal, and built for Deno – no Node.js setup headaches. It uses Vento, a templating language that's clean and easy to read. You don't need to install a million dependencies or wrestle with complex build tools. It just works.
If you're someone who can describe what you want in plain English and paste it into ChatGPT, you're already equipped to build your own personal site.
1. Set Up Your Project
First, make sure you have Deno installed.
Then, in your terminal:
deno run -A https://lume.land/init.ts my-resume

# ? What kind of setup do you want?
# ❯ Basic

# ? Do you want to setup a CMS? (More info at https://lume.land/cms/)
# ❯ No

cd my-resume
deno task serve
That's it. You're live at http://localhost:3000.
When you open the link, you will find a 404 - Not found page, as we haven't set up any content yet. But don't worry, we will fix that soon.
For now, let's install plugins to make our lives easier.
Installing Plugins
Since we want to use Tailwind CSS for styling, we need to install the Tailwind CSS plugin for Lume. This will allow us to use Tailwind's utility classes in our templates. To do this, we will also need to install the PostCSS plugin, which is required for Tailwind CSS to work properly.
We also want to use Font Awesome for icons, so we will install the Icons plugin, as well.
Open _config.ts and add the following lines:
import lume from "lume/mod.ts";
import icons from "lume/plugins/icons.ts";
import postcss from "lume/plugins/postcss.ts";
import tailwindcss from "lume/plugins/tailwindcss.ts";

const site = lume();

site.use(icons());
site.use(tailwindcss());
site.use(postcss());

export default site;
Create a new file called styles.css in the root of your project and add the following lines:
@tailwind base;
@tailwind components;
@tailwind utilities;
This will import the base, components, and utilities styles from Tailwind CSS.
Creating the Initial Layout of the Page
Next, we need to create a layout for our resume. Lume uses Vento as its default templating engine, which is a great choice for building static sites. Vento is simple and easy to use, making it perfect for our resume project.
To create a layout, we will create a new folder called _includes in the root of our project. Inside this folder, we will create another folder called layouts. This is where we will store our layout files.
Create a new file called base.vto inside the layouts folder. This file will contain the basic structure of our resume page.
<!DOCTYPE html>
<html lang="en">
  <head>
    <meta charset="UTF-8" />
    <meta name="viewport" content="width=device-width, initial-scale=1.0" />
    <title>{{ title }}</title>
    <link rel="stylesheet" href="/styles.css" />
  </head>
  <body>
    {{ content }}
  </body>
</html>
This is a basic HTML structure. You can add more meta tags, links to fonts, or any other head elements you need.
The curly braces {{ }} are Vento's way of saying "insert this here." You can use them to include variables, loops, conditionals, and other logic. The {{ content }} placeholder is where your page content will be injected.
Create a new file called index.yml in the root of your project. This file will be the main entry point for your resume site. It will contain the metadata for your site, such as the title and description. It will also include the content that will be displayed on the page.
layout: layouts/base.vto
title: My Resume
content: Welcome to my resume site!
Now you have a basic structure for your resume site. You can run deno task serve again to see the changes. Open http://localhost:3000 in your browser, and you should see "Welcome to my resume site!" displayed on the page.
It's a good place to save here, and let's do just that. Initialize a git repository and commit your changes:
git init
git add .
git commit -m "Initial commit"
Next, let's populate our resume!
2. Populate Your Resume Information
We will be using YAML here for simplicity. If you are new to YAML, it is a human-readable data serialization format that is easy to read and write. Checkout learnxinyminutes.com/yaml for a quick overview.
Let's update the index.yml file to include our resume information. Replace the content with the following:
title: Curriculum Vitae of Juan dela Cruz

profile:
  name: Juan dela Cruz
  title: Software Engineer
  summary: Experienced full-stack developer with a strong background in modern JavaScript frameworks and cloud-native applications. Passionate about clean code, developer tooling, and scalable software.

  contact:
    - icon:
        name: envelope
        library: fontawesome
        variant: solid
      text: juan.delacruz@example.com
      link: mailto:juan.delacruz@example.com

    - icon:
        name: phone
        library: fontawesome
        variant: solid
      text: +63 912 345 6789
      link: tel:+639123456789

    - icon:
        name: globe
        library: fontawesome
        variant: solid
      text: juandelacruz.dev
      link: https://juandelacruz.dev

    - icon:
        name: linkedin
        library: fontawesome
        variant: brands
      text: linkedin.com/in/juandelacruz
      link: https://linkedin.com/in/juandelacruz

    - icon:
        name: github
        library: fontawesome
        variant: brands
      text: github.com/juandelacruz
      link: https://github.com/juandelacruz

sections:
  - type: experience
    title: Work Experience
    items:
      - role: Software Engineer
        company: ABC Corp
        location: Makati, Philippines
        period: 2020 - Present
        description: Built and maintained scalable web applications using React, Node.js, and PostgreSQL. Led frontend modernization using TypeScript and integrated CI/CD pipelines.
      - role: Junior Developer
        company: XYZ Inc.
        location: Taguig, Philippines
        period: 2018 - 2020
        description: Assisted in building mobile apps using Flutter and Firebase. Contributed to internal libraries and team documentation efforts.

  - type: education
    title: Education
    items:
      - degree: BS Information Technology
        school: University of the Philippines
        location: Diliman, Quezon City
        period: 2014 - 2018

  - type: skills
    title: Technical Skills
    items:
      - JavaScript / TypeScript
      - React / Angular / Vue
      - Node.js / Deno
      - PostgreSQL / MongoDB
      - Docker / Kubernetes
      - CI/CD (GitHub Actions, Jenkins)

  - type: projects
    title: Projects
    items:
      - name: DevTracker
        url: https://github.com/juandelacruz/devtracker
        description: An open-source task management tool for developers built with Deno and Fresh.

  - type: certifications
    title: Certifications
    items:
      - name: AWS Certified Developer - Associate
        year: 2023
      - name: Google Professional Cloud Developer
        year: 2022

  - type: languages
    title: Languages
    items:
      - name: English
        level: Professional Proficiency
      - name: Filipino
        level: Native
There are a few things going on here, and we'll discuss them one-by-one.
YAML Syntax 101
YAML (YAML Ain't Markup Language) is a clean, human-readable format used for structured data. Here are a few basics used in your file:
- Key-Value Pairs:
key: valuepairs are used to define properties. For example,name: Juan dela Cruz. - Lists: Lists are defined with a dash
-followed by a space. For example,- JavaScript / TypeScriptis an item in the skills list. - Nested Structures: Indentation is used to define nested structures. For example,
sectionscontains a list of sections, each with its own properties.
Font Awesome Icon Structure
Each contact method in your contact section includes an icon object:
The icon object uses Font Awesome icons. The structure is as follows:
icon:
  name: icon-name
  library: fontawesome
  variant: regular | solid | brands
We can use another library defined in the icons plugin page, but for our purposes, we will use fontawesome.
Creating a separate file for the page data
You may notice that we removed the layout: layouts/base.vto line from the index.yml. Create a new file called _data.yml in your root directory. The content will simply be:
layout: layouts/base.vto
This is a special file containing data accessible by all pages in the same directory or subdirectory. In this file we have defined the variable layout so all pages have this variable too. There's no need to repeat it in the front matter of all pages, so we can remove it there.
It's now a good time to save our progress.
git add .
git commit -m "Add my information"
Updating the HTML Layout
Now that we have the structure of our data, it will now be easier to generate the HTML layout.
Go to ChatGPT and paste the following prompt:
Act like an expert in Lume SSG, Vento templating language, Tailwind, and YAML. I have the following YAML data for my professional resume:

<INSERT THE CONTENT OF index.yml HERE>

I want you to create a layout for my resume using Vento and Tailwind CSS. The layout should be responsive and look good on both desktop and mobile devices. Use Tailwind CSS classes for styling. It should be a Harvard-style CV with a header, sections for experience, education, skills, projects, certifications, and languages. Use the data from the YAML file to populate the layout.

There should be a loop that generates each section based on the `type` given.

For example:

{{ for section of sections }}
  <section class="mb-6">
    <h2 class="text-xl font-semibold border-b pb-1 mb-3 uppercase tracking-wide">{{ section.title }}</h2>
    {{ if section.type === "experience" }}
      {{ for item of section.items }}
        <div class="mb-4">
          <div class="flex justify-between">
            <strong class="text-md">{{ item.role }} – {{ item.company }}</strong>
            <span class="text-sm text-gray-500">{{ item.period }}</span>
          </div>
          <div class="text-sm text-gray-600 italic">{{ item.location }}</div>
          <p class="text-sm mt-1">{{ item.description }}</p>
        </div>
      {{ /for }}
    {{ /if }}
  </section>
{{ /for }}

This is my current `_includes/layouts/base.vto` which you should modify:

<INSERT THE CONTENT OF _includes/layouts/base.vto HERE>

Remove the `{{ content }}` as it is not needed anymore and replace it with the necessary code. It should look good on print. It should look like a piece of paper floating in the middle of the page. The goal is for me to get hired when recruiters see my profile.
If it goes well, it should generate something like this:
<!DOCTYPE html>
<html lang="en">
  <head>
    <meta charset="utf-8" />
    <meta name="viewport" content="width=device-width, initial-scale=1" />
    <title>{{ title }}</title>
    <link href="/styles.css" rel="stylesheet" />
    <style>
      @media print {
        body {
          background: white !important;
        }
      }
    </style>
  </head>
  <body class="bg-gray-100 text-gray-900">
    <main
      class="max-w-3xl mx-auto my-8 bg-white p-10 shadow-lg rounded-xl print:shadow-none print:p-0 print:rounded-none print:bg-white print:max-w-full print:my-0 print:text-black"
    >
      <!-- Header -->
      <header class="text-center border-b pb-4 mb-6">
        <h1 class="text-3xl font-bold">{{ profile.name }}</h1>
        <p class="text-xl text-gray-700">{{ profile.title }}</p>
        <p class="mt-2 text-sm text-gray-500">{{ profile.summary }}</p>
        <div class="mt-4 text-sm text-gray-600 space-y-1">
          {{ for item of profile.contact }}
          <div class="flex items-center gap-2">
            <img
              src="{{ item.icon.name |> icon(item.icon.library, item.icon.variant) }}"
              class="h-4 w-4"
              alt="{{ item.text }}"
            />
            <a
              href="{{ item.link }}"
              class="hover:underline text-blue-600"
              target="_blank"
            >
              {{ item.text }}
            </a>
          </div>
          {{ /for }}
        </div>
      </header>

      <!-- Sections -->
      {{ for section of sections }}
      <section class="mb-6">
        <h2
          class="text-xl font-semibold border-b pb-1 mb-3 uppercase tracking-wide"
        >
          {{ section.title }}
        </h2>

        {{ if section.type === "experience" }} {{ for item of section.items }}
        <div class="mb-4">
          <div class="flex justify-between">
            <strong class="text-md"
              >{{ item.role }} – {{ item.company }}</strong
            >
            <span class="text-sm text-gray-500">{{ item.period }}</span>
          </div>
          <div class="text-sm text-gray-600 italic">{{ item.location }}</div>
          <p class="text-sm mt-1">{{ item.description }}</p>
        </div>
        {{ /for }} {{ /if }} {{ if section.type === "education" }} {{ for item
        of section.items }}
        <div class="mb-4">
          <div class="flex justify-between">
            <strong class="text-md">{{ item.degree }}</strong>
            <span class="text-sm text-gray-500">{{ item.period }}</span>
          </div>
          <div class="text-sm text-gray-600 italic">
            {{ item.school }} – {{ item.location }}
          </div>
        </div>
        {{ /for }} {{ /if }} {{ if section.type === "skills" }}
        <ul
          class="grid grid-cols-2 gap-1 text-sm list-disc list-inside text-gray-700"
        >
          {{ for skill of section.items }}
          <li>{{ skill }}</li>
          {{ /for }}
        </ul>
        {{ /if }} {{ if section.type === "projects" }} {{ for project of
        section.items }}
        <div class="mb-3">
          <a
            href="{{ project.url }}"
            class="text-blue-700 font-medium hover:underline"
            >{{ project.name }}</a
          >
          <p class="text-sm text-gray-600">{{ project.description }}</p>
        </div>
        {{ /for }} {{ /if }} {{ if section.type === "certifications" }}
        <ul class="list-disc list-inside text-sm text-gray-700">
          {{ for cert of section.items }}
          <li>
            {{ cert.name }} <span class="text-gray-500">({{ cert.year }})</span>
          </li>
          {{ /for }}
        </ul>
        {{ /if }} {{ if section.type === "languages" }}
        <ul class="list-disc list-inside text-sm text-gray-700">
          {{ for lang of section.items }}
          <li>{{ lang.name }} — {{ lang.level }}</li>
          {{ /for }}
        </ul>
        {{ /if }}
      </section>
      {{ /for }}
    </main>
  </body>
</html>
You can run deno task serve again to see the changes. Open http://localhost:3000 and check your new site.
Let us save our progress.
git add .
git commit -m "Add initial layout"
3. Replacing the Values with Your Own Data
You can manually edit the index.yml, for use ChatGPT.
You can use this prompt:
Act like an expert in Lume SSG, Vento templating language, and YAML. I have the following YAML template for a static site for my professional resume:

<INSERT THE CONTENT OF index.yml HERE>

This is my current CV:

<INSERT THE CONTENT OF YOUR CV HERE OR UPLOAD A COPY OF THE FILE>

Can you generate a new YAML file that follows the template I sent to you? Do not update the keys as they are imporant. Only update the content.

Reply to me directly and do not use a document-style reply.
You can also add something like this at the end:
Please improve the content that I wrote. I want to get hired by companies so make it readable, and expand on some of the parts as needed.
Once you are happy, save the changes:
git add .
git commit -m "Update CV information"
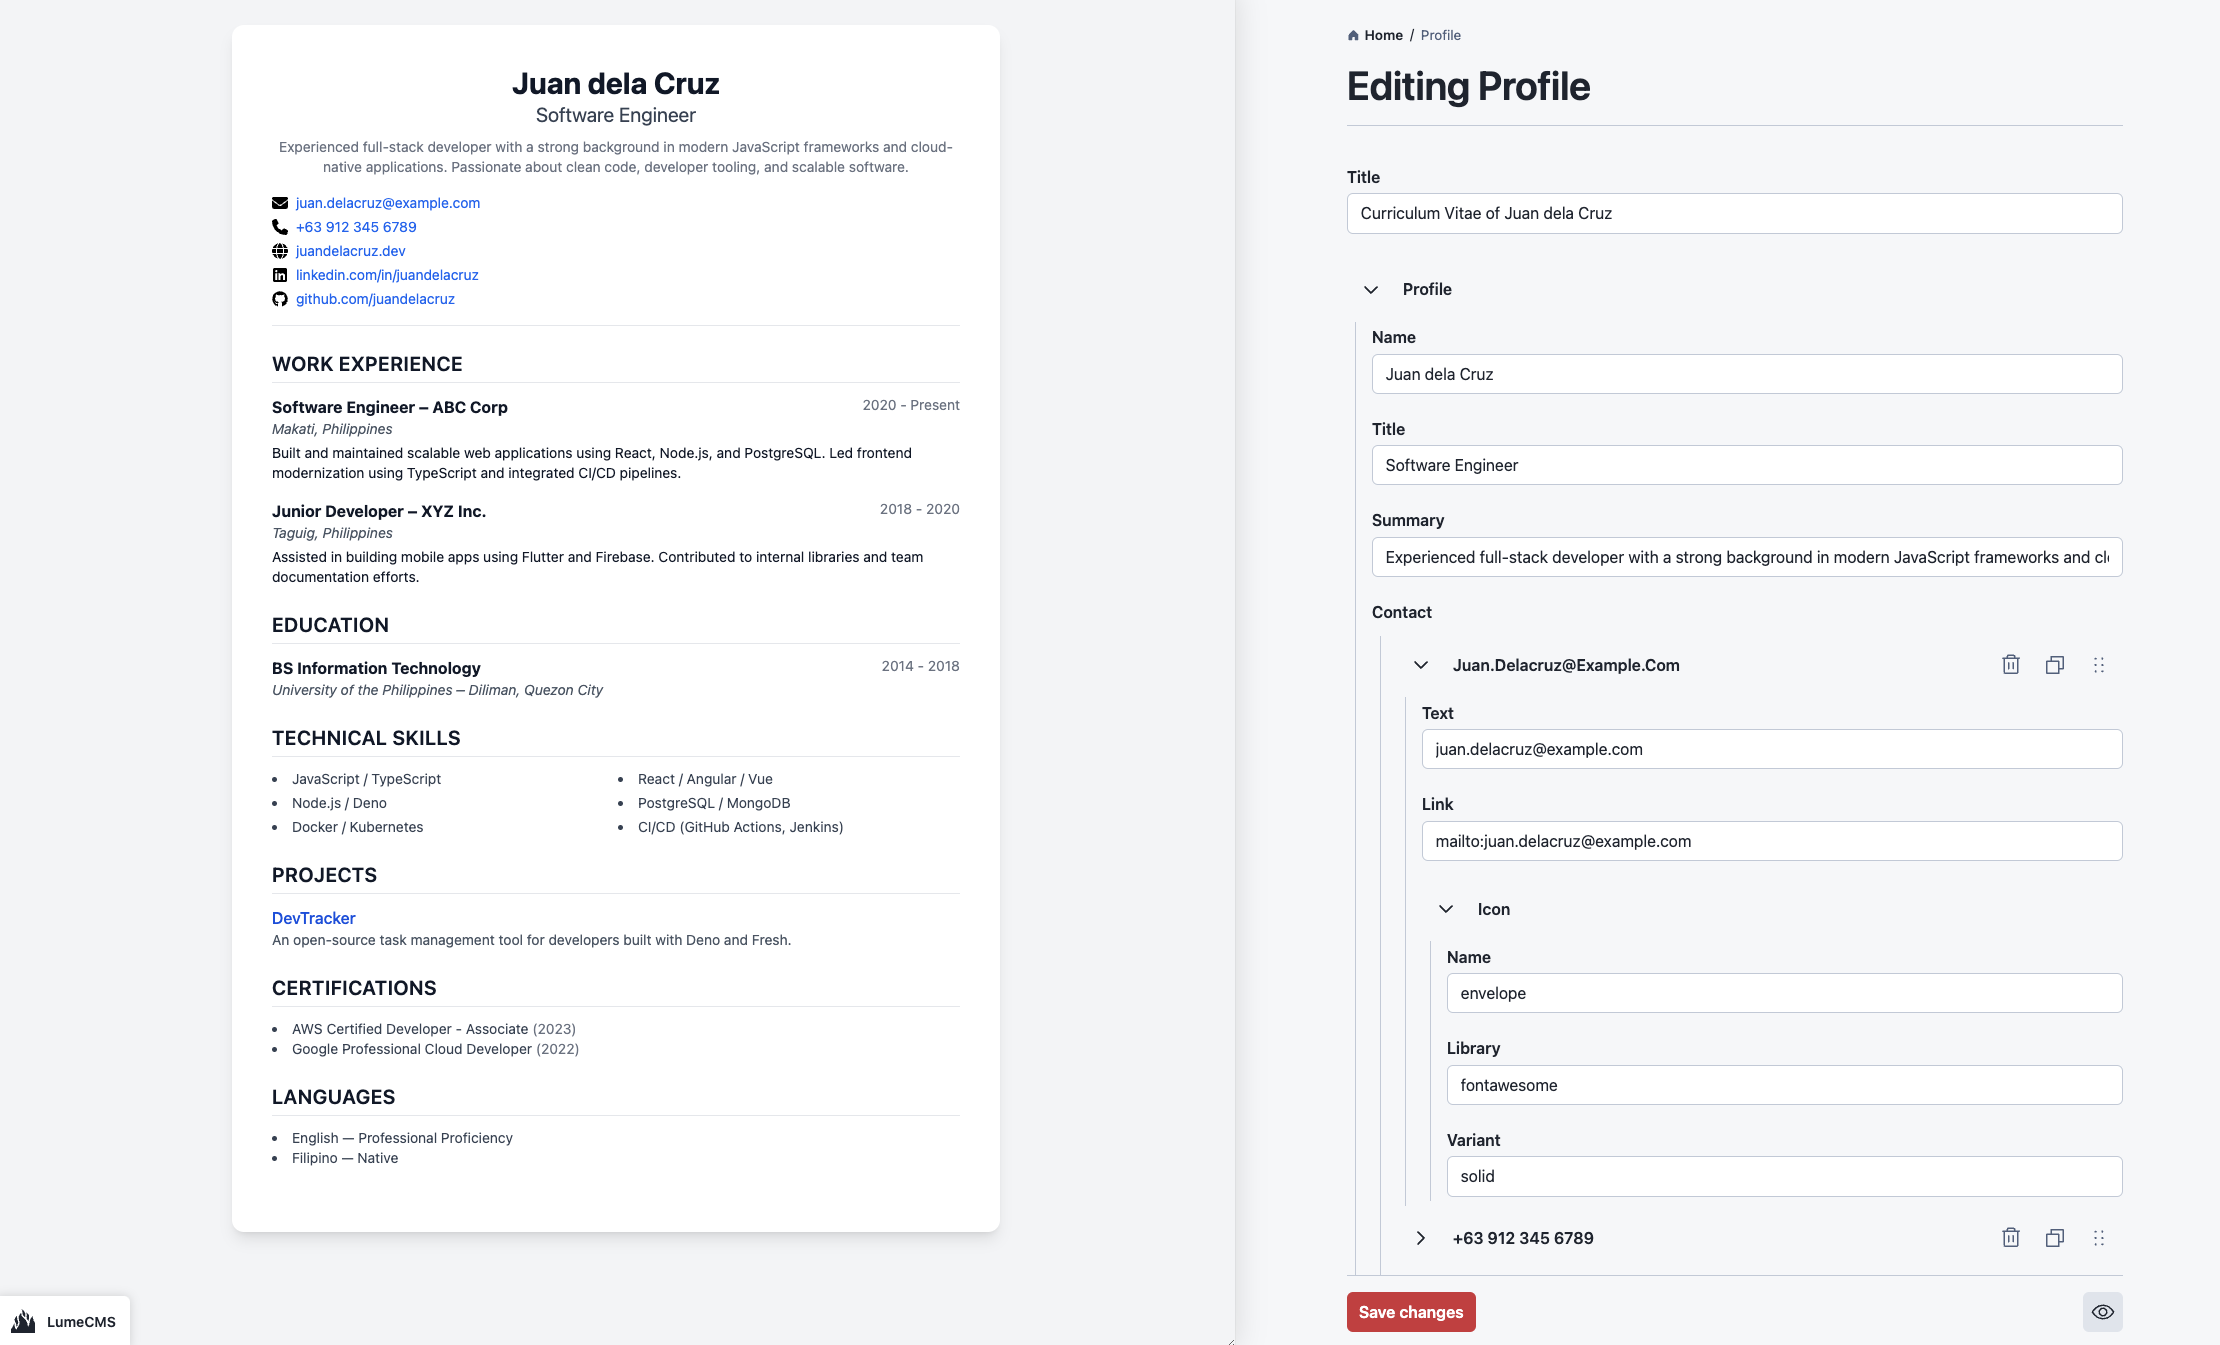
4. Add Content with LumeCMS (Optional)
Instead of editing templates manually, use LumeCMS to manage your resume content using a UI.
Create a new file called _cms.ts and put it to your root directory
import CMS from "lume/cms/mod.ts";

const cms = CMS();

cms.document({
  name: "Profile",
  description: "Edit the content of the user's professional profile",
  store: "src:index.yml",
  fields: [
    "title: text",
    {
      name: "profile",
      type: "object",
      fields: [
        "name: text",
        "title: text",
        "summary: text",
        {
          name: "contact",
          type: "object-list",
          fields: [
            "text: text",
            "link: text",
            {
              name: "icon",
              type: "object",
              fields: ["name: text", "library: text", "variant: text"],
            },
          ],
        },
      ],
    },
    {
      name: "sections",
      type: "choose-list",
      fields: [
        {
          name: "experience",
          type: "object",
          fields: [
            "title: text",
            {
              name: "items",
              type: "object-list",
              fields: [
                "role: text",
                "company: text",
                "location: text",
                "period: text",
                "description: text",
              ],
            },
          ],
        },
        {
          name: "education",
          type: "object",
          fields: [
            "title: text",
            {
              name: "items",
              type: "object-list",
              fields: [
                "degree: text",
                "school: text",
                "location: text",
                "period: text",
              ],
            },
          ],
        },
        {
          name: "skills",
          type: "object",
          fields: [
            "title: text",
            {
              name: "items",
              type: "list",
            },
          ],
        },
        {
          name: "projects",
          type: "object",
          fields: [
            "title: text",
            {
              name: "items",
              type: "object-list",
              fields: ["name: text", "url: text", "description: text"],
            },
          ],
        },
        {
          name: "certifications",
          type: "object",
          fields: [
            "title: text",
            {
              name: "items",
              type: "object-list",
              fields: ["name: text", "year: text"],
            },
          ],
        },
        {
          name: "languages",
          type: "object",
          fields: [
            "title: text",
            {
              name: "items",
              type: "object-list",
              fields: ["name: text", "level: text"],
            },
          ],
        },
      ],
    },
  ],
});

export default cms;
Add two lines to your your deno.json:
{
  "imports": {
+   "lume/cms/": "https://cdn.jsdelivr.net/gh/lumeland/cms@0.11.3/",
    "lume/": "https://deno.land/x/lume@v2.5.3/"
  },
  "tasks": {
    "lume": "echo \"import 'lume/cli.ts'\" | deno run -A -",
+   "cms": "deno task lume cms",
    "build": "deno task lume",
    "serve": "deno task lume -s"
  },
  "compilerOptions": {
    "types": [
      "lume/types.ts"
    ]
  }
}
You can now run deno task cms and you can edit your CV using the CMS:
Don't forget to save:
git add .
git commit -m "Add CMS to manage information"
5. Deploy to GitHub Pages
Once your resume site looks good locally, it's time to put it on the internet so other people can see it—especially hiring managers!
What is GitHub?
GitHub is a website where developers (and aspiring developers like you!) can store code, collaborate on projects, and host websites.
We're going to use GitHub to host your resume site for free using a feature called GitHub Pages.
If you don't already have an account, go to GitHub, click Sign up and follow the steps to create a free account.
Create a GitHub Repository
- Click the + icon in the top-right, then choose "New repository"
- Fill out the form:
- Repository name: my-resume (or anything you like)
- Keep it Public
- Don't initialize with a README (we already have files)
- Click Create repository
Connect Your Project to GitHub
git remote add origin https://github.com/YOUR-USERNAME/YOUR-REPO-NAME.git
Create the new CI Workflow
Create a .github/workflows/deploy.yml file and add the following:
name: Publish on GitHub Pages

on:
  push:
    branches: [main]

permissions:
  contents: read
  pages: write
  id-token: write

jobs:
  build:
    runs-on: ubuntu-latest

    environment:
      name: github-pages

    steps:
      - name: Clone repository
        uses: actions/checkout@v4

      - name: Setup Deno environment
        uses: denoland/setup-deno@v2

      - name: Build site
        run: deno task build

      - name: Setup Pages
        uses: actions/configure-pages@v5

      - name: Upload artifact
        uses: actions/upload-pages-artifact@v3
        with:
          path: "_site"

      - name: Deploy to GitHub Pages
        id: deployment
        uses: actions/deploy-pages@v4
Commit your changes and push them to GitHub:
git add .
git commit -m "Deploy to GitHub"
git push
Enable GitHub Pages
Go to your repository on GitHub and click Settings.
On the left, go to Pages.
Under Build and deployment, select GitHub Actions as your source.
Your site will be live shortly at YOUR-USERNAME.github.io/YOUR-REPO-NAME.
6. Bonus: Add It to the Lume Themes Showcase
Once you're happy with it, you can submit it as a community theme at lume.land/themes. Create a new Issue at lumeland/themes, describe what your theme does, and you might help someone else get started with Lume too.
Final Thoughts
This setup is ideal for folks who don't want to memorize HTML, CSS, or Deno APIs. With Tailwind and Vento, layout and styling is clear. And ChatGPT can generate entire sections for you – from experience blurbs to layout tweaks.
Start small. Try edits. Break stuff. Then fix it with prompts. That's how you learn.
If you want to see a full example, I added a Lume theme called pro-file. You can check it at lume.land/theme/pro-file.
To use it in an empty project, you can do:
deno run -A https://lume.land/init.ts --theme=pro-file
Happy building!